DTF transfers on light vs dark fabrics determine how you balance color, underbase, and heat during the press. On light fabrics, vibrant results often come with a lighter underbase and a shorter dwell time, while light texture and weave can influence adhesion. DTF transfers on dark fabrics require a solid white underbase and careful control of DTF transfer temperature and settings to prevent halos and fading. For best results, follow practical DTF printing on fabrics tips and keep troubleshooting steps in your workflow with clear DTF transfer troubleshooting guidelines. By aligning design choices, fabric type, and press parameters, you can achieve durable, vibrant prints across both light and dark garments.
Translating the concept to plainer language, designers should consider how this print-on-film method behaves on lighter textiles versus darker fibers. In lighter fabrics, the white base can be lighter or less dense, while darker textiles demand a solid canvas to keep hues accurate. LSI-style terms you might encounter include film-based transfer, underbase opacity, color layering, adhesion behavior, and wash durability across different fiber blends. Understanding these relationships helps plan artwork, select fabrics, and optimize post-press care for consistent results.
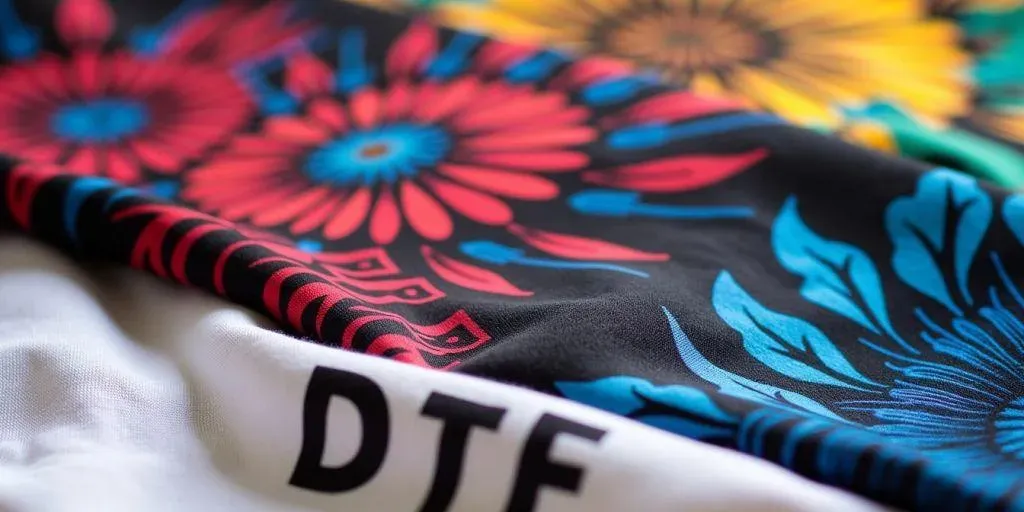
DTF transfers on light vs dark fabrics: how fabric color shapes performance
Fabric color fundamentally influences how well DTF transfers appear and endure. When working with light fabrics, you typically enjoy brighter colors with a lighter white underbase, which can translate into faster press times and potentially less ink usage. In contrast, dark fabrics demand a solid white underbase to mask the garment’s natural color, ensuring true hues show through and avoiding color tinting. Understanding these dynamics is essential for achieving crisp edges, strong color fidelity, and reliable wash durability across fabric tones.
Beyond color alone, the texture and weave of the fabric can affect adhesion and edge definition. Light, smooth fabrics tend to lay the film more evenly, while darker, textured fabrics may reveal gaps or ghosting if the underbase and color layers aren’t properly calibrated. These nuances should guide your initial setup and testing, helping you tailor your workflow to each fabric family and reduce reprints.
Designing for light and dark fabrics: artwork and color strategy
Effective DTF design considers both light and dark canvases from the outset. For light fabrics, you can emphasize color richness with vibrant hues and a thinner underbase, which speeds up production while preserving brightness. For dark fabrics, design with stronger contrast and a robust white layer so colors pop once the underbase is applied. Offering two design variants—one optimized for light fabrics and a “white-ink-underbase” variant for dark fabrics—can streamline production and keep your customers’ expectations aligned.
When preparing artwork, separate the white underbase from color layers and plan the printing order accordingly. Clear layering helps prevent misregistration and ensures predictable results when you switch between fabric tones. Incorporating scalable designs and test prints for both light and dark variants is a prudent practice that minimizes waste and improves consistency.
DTF transfer temperature and settings: optimizing heat, time, and pressure
Temperature, dwell time, and pressure are the levers that determine transfer quality. Practical starting points often cited by printers recommend about 150-160°C (300-320°F) for light fabrics with 10-15 seconds of dwell, plus a short pre-press to remove moisture. For dark fabrics, higher heat and a longer dwell time—roughly 160-170°C (320-338°F) for 12-20 seconds—help ensure the white underbase bonds securely and the color layers don’t peel after washing.
Always test on scrap garments and record results, because ink formulations and carrier films vary by brand. Pre-press for 5-8 seconds on both light and dark fabrics to flatten fibers, then follow with a cooldown or a brief post-press to lock the adhesive. If you encounter issues, fine-tune temperature, time, and pressure in small increments and verify that your film and printer settings align with the manufacturer’s recommendations.
White underbase and color layering: building opacity for dark fabrics
The white underbase is the backbone of durable DTF transfers on dark fabrics. A solid, evenly printed white layer creates a clean canvas that preserves color vibrancy and prevents the garment’s color from tinting the design. If the underbase is thin or inconsistent, you’ll notice color shifting or print-through after curing and washing.
On light fabrics, you can often reduce underbase density to save ink and speed production without sacrificing vibrancy. After the underbase, color layering should follow a precise sequence, as the film inks sit on top of the carrier. Ensure alignment and opacity are tuned so that top colors read clearly on both light and dark garments, using a final stabilizing coat to improve wash durability.
DTF transfer troubleshooting: common issues and fixes
Common issues include ghosting or pale colors on light fabrics or halos around edges on dark fabrics. Diagnosing these problems often points back to underbase density, alignment, or insufficient press force. When you see ghosting, increase underbase opacity slightly, adjust dwell time, and verify you’re not over-relying on scale to compensate for fabric color.
Other frequent fixes involve curing and post-press steps. Cracking after washing can indicate undercuring or overly aggressive stretching fabrics; try a longer dwell time or a higher temperature within safe limits. If edges fuzz or snag, review fabric compatibility and consider a sharper edge on the transfer or a higher-quality silicone sheet. Document each adjustment so you can reproduce successful results.
Best-practice workflow for reliable DTF across light and dark fabrics
A practical workflow treats light and dark fabric work as parallel tracks. Begin with design planning that includes separate underbase and color layers for dark fabrics and a streamlined color approach for light fabrics. Use test swatches to dial in white density, color layering order, and post-press timing before committing to larger batches.
Maintain meticulous records of settings and outcomes for every fabric type and brand you work with. Regularly revisit your pre-press, curing, and wash-care instructions to ensure durable adhesion and color fidelity. Consistent testing, documentation, and workflow refinements are the most reliable ways to reduce reprints and keep DTF transfers on light vs dark fabrics consistently high in quality.
Frequently Asked Questions
What are the key differences between DTF transfers on light fabrics and DTF transfers on dark fabrics?
DTF transfers on light fabrics typically require less white underbase and yield brighter colors, while DTF transfers on dark fabrics rely on a solid white underbase to mask the fabric and prevent color shifts. The fabric texture and pre-press needs also differ, which affects edge definition and durability.
What are the recommended DTF transfer temperature and settings for light fabrics vs dark fabrics?
For light fabrics, aim for about 150–160°C (300–320°F) for 10–15 seconds with medium pressure; for dark fabrics, use about 160–170°C (320–338°F) for 12–20 seconds with medium to firm pressure. Always include a 5–8 second pre-press and a 5–10 second post-press to set adhesion.
What common DTF transfer troubleshooting steps apply to both light and dark fabrics?
Common steps include checking white underbase density, ensuring even heat and pressure, confirming precise alignment, and testing on scraps before full runs. Verify proper curing and adjust dwell time if there are peels, halos, or color shifting after washing.
What DTF printing on fabrics tips help maximize vibrancy on light and dark fabrics?
Use appropriate underbase density for dark fabrics to avoid tinting, while reducing underbase density on light fabrics to save ink. Plan color layering for both fabric types, and run small tests to fine-tune densities, dwell times, and color balance.
How should I design and prepare artwork for DTF transfers on light vs dark fabrics to minimize issues?
Create separate white-underbase strategies for dark fabrics and standard color variants for light fabrics, ensuring higher contrast on dark garments. Design with considerations for edge clarity and potential haloing, and test prints on scraps to verify layering order and registration before production.
| Key Point | Light Fabrics | Dark Fabrics | Practical Tips | |
|---|---|---|---|---|
| Fabric color impact | Bright colors with minimal white underbase; smoother surface aid even transfer | White underbase essential to conceal fabric color; solid coverage is needed | Pre-test on both fabric types; calibrate underbase density and texture handling | |
| Artwork/design considerations | Emphasize color richness; thinner underbase for faster production | Use stronger white base and ensure high contrast for visibility | Offer two design variants (white-underbase for dark fabrics and standard for light fabrics) | |
| Temperature, time, and pressure | 150-160°C (300-320°F); 10-15 s; medium pressure; light pre-press | 160-170°C (320-338°F); 12-20 s; medium to firm pressure; longer dwell | Always test on samples; follow supplier recommendations; adjust for ink/film brand | |
| White underbase and color layering | Underbase density can be reduced slightly; color layers layer over base | White underbase is the backbone; ensure solid, even application | Print in correct sequence; use final topcoat for durability; ensure even curing | |
| Pre-press, curing, and post-care | 5-8 seconds pre-press; post-press 5-10 seconds; cool before peeling; wash inside-out | Pre-press similar; longer dwell or temperature adjustments may help on dense fabrics; proper cure essential | Follow garment care guidelines; cold/warm wash; avoid high heat early washes; protects adhesive and print | |
| Troubleshooting common issues | Ghosting/pale colors: adjust underbase density and dwell/pressure | White underbase visible: ensure solid, even underbase; reprint with corrected density | Reprint with corrected alignment and curing parameters; verify fabric compatibility | |
| Practical step-by-step workflow | Prepare design and color layers; separate white underbase for dark fabrics; print film | Pre-press fabric; position print; apply transfer with fabric-specific settings | Peel carrier per film spec; post-press to set; let garment cool; test wash | Document results; adjust settings for different blends; maintain a consistent workflow |
Summary
Table summarizes key points on DTF transfers for light and dark fabrics, including how fabric color affects underbase needs, design considerations, temp/time/pressure ranges, layering, pre-press and post-care, troubleshooting, and a practical workflow.